How to manage DNS Records from cPanel?
Do you want to manage DNS Records from cPanel? If yes then don’t worry!
In this article, you will learn how you can easily to manage DNS Records from cPanel by just following 5 simple steps.
Without any further due, let’s move on to the topic…
Steps to manage DNS Records from cPanel :
STEP 1 – Login To Your cPanel Account
- Go to NinzaHost.
- Login your Account.
- Select your Active Product/Services.
- Click on “Login to cPanel” under Action Tab.
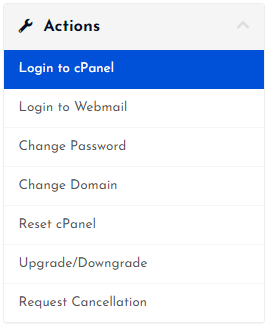
- Then you will automatically redirected to your cPanel Account.
Or, If you have cPanel login details then you can easily login to your cPanel account by visiting yourdomain.com/cpanel.
STEP 2 – Go To Zone Editor
- Click on “Zone Editor”

STEP 3 – Manage DNS Records

STEP 4 – Go To Add Record
- Click on ” Add Record”

- In the next page, you can manage your DNS records.
- In order to Add Any Record, you have to:
- Provide Host Name
- Choose Record Type
- Give the Address
- Then, click on the “Add Record” button.

- That’s it, you are done.
Thanks for reading this article. Hope, you are now understand how you can easily to manage DNS Records from cPanel
If you still have any doubts or suggestions then please let us know through your comments in the comments section below.